# Feature Management in ReactJS

In this post, I'll show you how to implement feature management on your React applications. Feature management is the way to control which features are available based on certain scenarios.

## Why Do Feature Management?
Here are some scenarios where controlling feature availability is necessary:

1. **The feature should only be turned on after a marketing event.** With feature flags, the feature can already be sitting in production and an administrator can just simply enable it via configuration once the event is done.
2. **The feature should only be available to users on a specific plan.**

All of these scenarios share the same concept. In this post, we'll focus on the 2nd one. Let's go!

## The Requirements
Let's say we're building a blog application that offers the ff. features:
- Updating Title and Content
- Publishing to multiple blog platforms
- Scheduling the publish time

Now, let's say the app offers 3 plans to users: Basic, Pro, and, Ultimate. 

With these plans, the team has decided to have a plan comparison table that looks like this:

| Feature | Basic | Pro | Ultimate |
| ----------- | ------- | ------- | ------- |
| Update Title and Content | Yes | Yes | Yes |
| Schedule the publish time ​| No | Yes | Yes |
| Publish to multiple blog platforms | No | No | Yes |

We now have all the requirements defined. Let's start building!

## The Starting Point
For your reference, the initial state of the project can be found [here](https://github.com/projectkenneth/react-feature-control/tree/Initial-State). 

For simplicity, we only have the `New Blog` page in this version.

The page contains the following:
- A Role Switcher to simulate changing of the plans
- All the features are still available to the user

Here's how it looks like at this point:
![FC-React-2.png](https://cdn.hashnode.com/res/hashnode/image/upload/v1633927794332/Qy1vYMk9D.png)

### The Role Switcher
Here's a look at the `RoleSwitcher` component:
```
function RoleSwitcher({ plans, activePlan, setActivePlan }) {
    const navItemTags = () =>
        plans.map((label, index) =>
            <li className="nav-item" key={index}>
                <button className={"nav-link" + (activePlan === index ? " active" : "")} onClick={e => setActivePlan(index)}>{label}</button>
            </li>
        );

    return (
        <ul className="nav nav-pills">
            {navItemTags()}
        </ul>
    );
};
```

The component receives 3 properties which are passed by the `App` component.
```
function App() {
  const availablePlans = Config.availablePlans;
  const [activePlan, setActivePlan] = useState(0);

  <RoleSwitcher 
    plans={availablePlans} activePlan={activePlan} 
    setActivePlan={setActivePlan} />
```

The `App` component then refers to the `availablePlans` exposed by `Config.js`
```
const Config = {
    availablePlans: ['Basic', 'Pro', 'Ultimate']
};
```

The `RoleSwitcher` displays all the available plans and allows the user to set the `activePlan`. The `activePlan` variable will then be passed to the `Editor` component later on.

## The Feature-Based Approach
Now, let's update the other features to only be shown on the appropriate plan.

In this approach, we let the plans identify the features that are going to be available in them.

Therefore, we need to make changes to the `Config` file:
```
const Config = {
    availablePlans: [
        {
            id: 0,
            name: 'Basic',
            features: []
        },
        {
            id: 1,
            name: 'Pro',
            features: ['scheduledPost']
        },
        {
            id: 2,
            name: 'Ultimate',
            features: ['scheduledPost', 'multiplePublishers']
        }
    ]
};
```

In the above change, each plan inside the `availablePlans` array now has a list of `features` that are available in them.

Then, let's update the `RoleSwitcher` to support this new format:
```
function RoleSwitcher({ plans, activePlan, setActivePlan }) {
    const navItemTags = () =>
        plans.map((plan) =>
            <li className="nav-item" key={plan.id}>
                <button 
                    className={"nav-link" + (activePlan.id === plan.id ? " active" : "")} 
                    onClick={e => setActivePlan(plan)}>{plan.name}</button>
            </li>
        );

    return (
        <ul className="nav nav-pills">
            {navItemTags()}
        </ul>
    );
};
```

The initialization section of the `App` component also needs to be updated:
```
const availablePlans = Config.availablePlans;
const [activePlan, setActivePlan] = useState(availablePlans[0]);
```

And now, for the star of this post, let's talk about the `FeatureBlock` component!

### The Feature Block Component
```
function FeatureBlock(props) {
    const isFeatureVisible = props.activePlan.features
        .find(feature => feature === props.featureName);

    if (isFeatureVisible) {
        return (
                <>
                    {props.children}
                </>
            );
    } else {
        return null;
    }
};
```

The `FeatureBlock` component is a wrapper component and receives the following:
- The `activePlan` property to determine the selected plan
- The `featureName` property to which will be matched against the `features` list of the `activePlan` property. If a match is found, the `FeatureBlock`'s children will be rendered.
- The component's children which are conditionally rendered based on the above 2 properties

For simplicity, we'll only use the `FeatureBlock` component to wrap the publisher and scheduled inputs in the `Editor` component. This is because the title and content fields are available to all plans anyway.

The `Editor` component will now have this structure:
```
function Editor({ activePlan }) {
    return (
        <div className="col col-12">
            <h1>New Post</h1>
            <!--Title and content fields here-->
            <FeatureBlock activePlan={activePlan} 
                featureName="multiplePublishers">
                <!--The publishers selection here-->
            </FeatureBlock>
            <FeatureBlock activePlan={activePlan} 
                featureName="scheduledPost">
                <!--The schedule input here-->
            </FeatureBlock>
            <!--Save and submit buttons here-->
    );
}
```

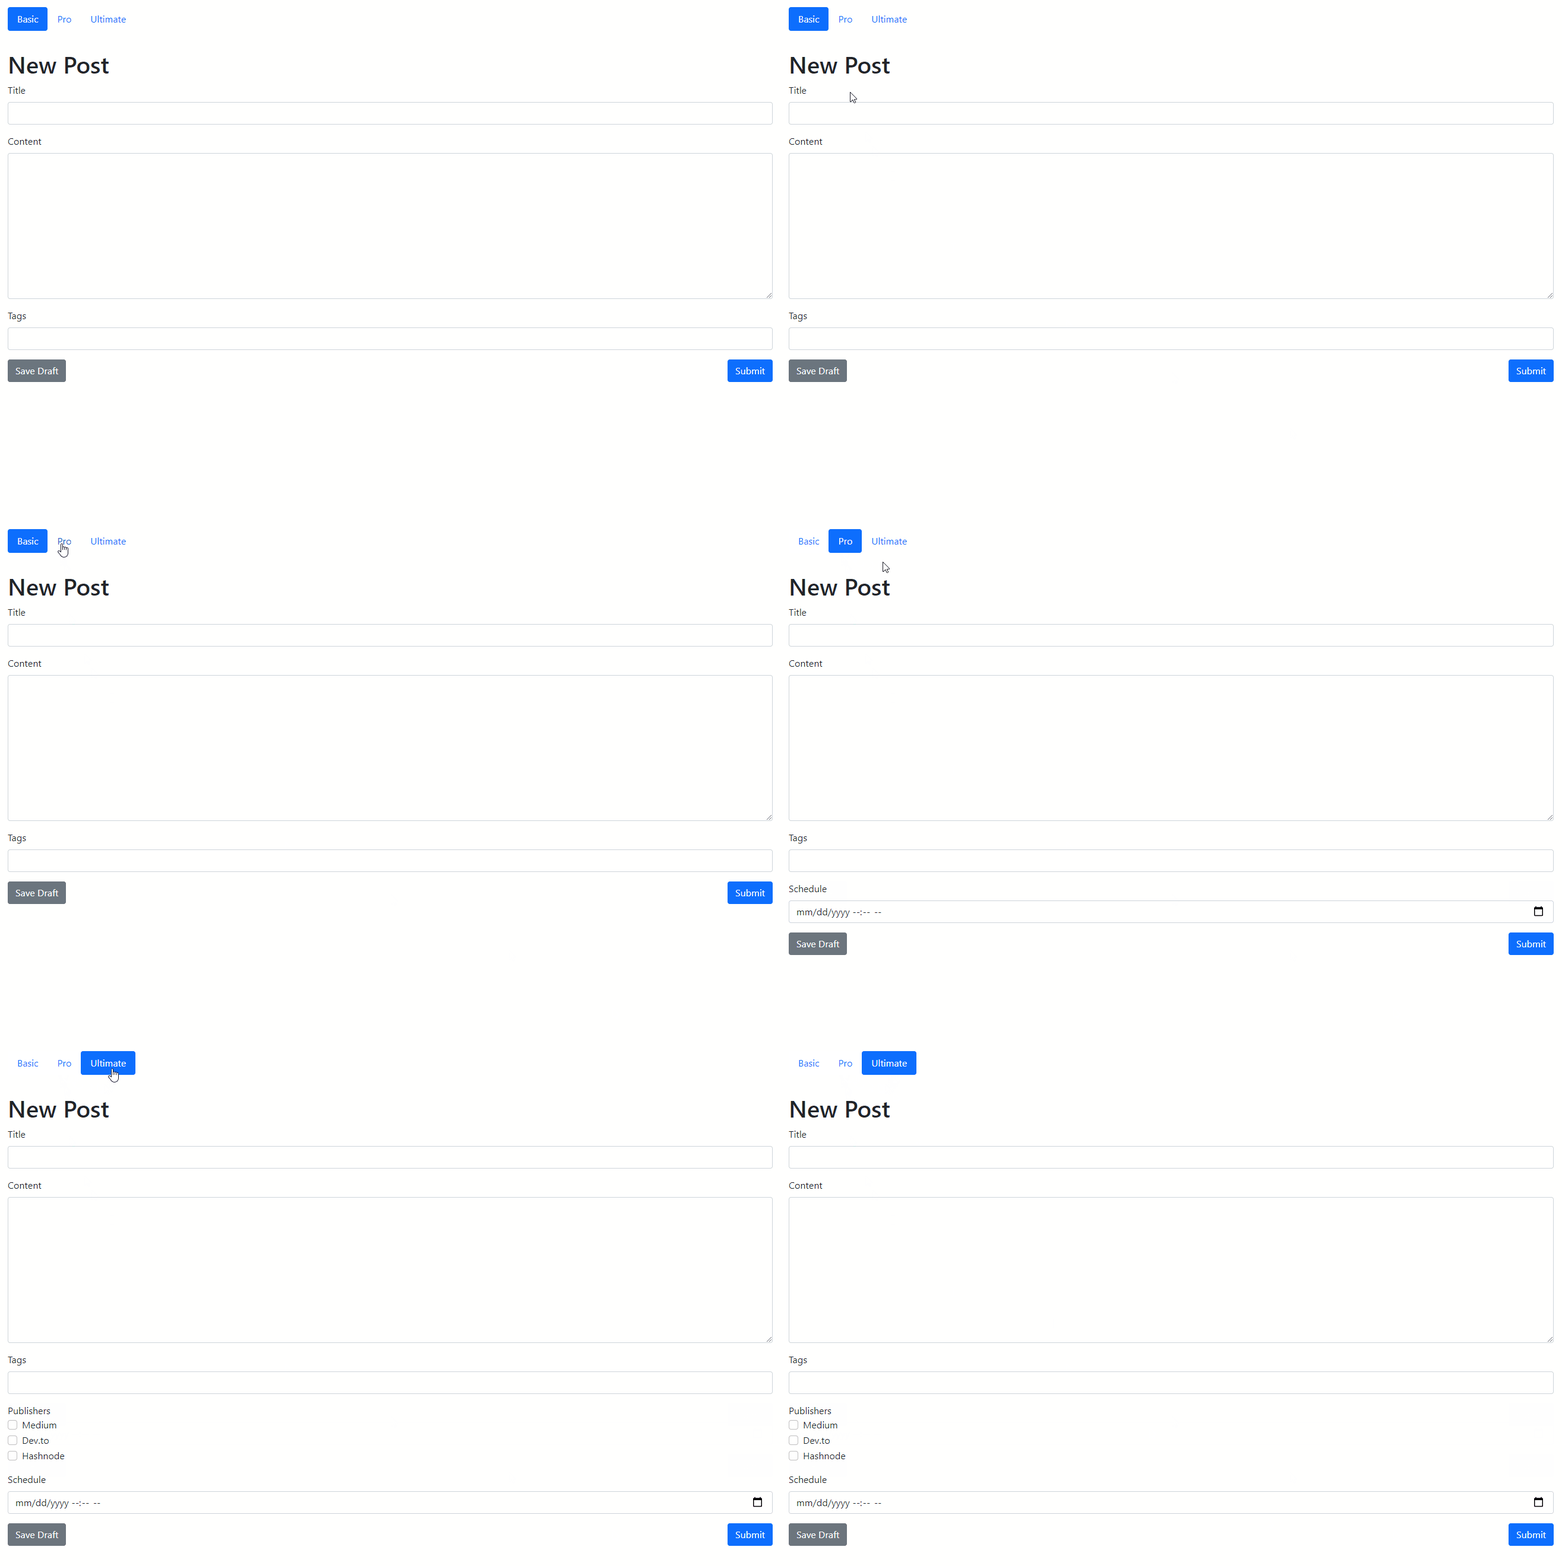
After all these changes, the `RoleSwitcher` will now toggle the visibility of the publisher and schedule inputs.
![FC-React-3.gif](https://cdn.hashnode.com/res/hashnode/image/upload/v1633930537427/PvnYN38yE.gif)

As you can see, everything is functioning as expected. But, there's a problem with the `Config` file. 

It's too centralized! Once the app grows, the `Config` file has the potential to be bloated. Let's solve this in the next section.

By the way, [here's the code](https://github.com/projectkenneth/react-feature-control/blob/Feature-Based-Check) at this point.

## The Plan-Based Approach
To solve the problem with the `Config` file, we should follow a plan-based approach.

In this approach, we're inverting the dependency. Instead of letting the plan define the features available, we let the features specify which plans they should be available on. This is a more modular and cleaner approach.

The `Editor` component will now have this structure:
```
function Editor({ activePlan }) {
    return (
        <div className="col col-12">
            <h1>New Post</h1>
            <!--Title and content fields here-->
            <FeatureBlock activePlan={activePlan} 
                planNames={["Ultimate"]}>
                <!--The publishers selection here-->
            </FeatureBlock>
            <FeatureBlock activePlan={activePlan} 
                planNames={["Pro", "Ultimate"]}>
                <!--The schedule input here-->
            </FeatureBlock>
            <!--Save and submit buttons here-->
    );
}
```

The `FeatureBlock` will also be updated to support this change:
```
function FeatureBlock(props) {
    const isFeatureVisible = props.planNames.find(plan =>
        plan === props.activePlan.name);

    if (isFeatureVisible) {
        return (
            <>
                {props.children}
            </>
        );
    } else {
        return null;
    }
};
```

Now that the `Config` will not be responsible for storing the plan-to-feature mappings anymore, it can already be simplified to:
```
const Config = {
    availablePlans: [
        {
            id: 0,
            name: 'Basic'
        },
        {
            id: 1,
            name: 'Pro'
        },
        {
            id: 2,
            name: 'Ultimate'
        }
    ]
};
```

[Here's the code](https://github.com/projectkenneth/react-feature-control/blob/Plan-Based-Check) at this point.

## In Summary

We've successfully implemented Feature Management in React!

What I've provided is simply a skeletal reference. You can expand it further to support more advanced requirements.

In my case, I was thinking to implement user-specific feature availability. In this scenario, specific features can only be available to users who pass certain conditions.

For example, what if only want to make the scheduled publishing feature available to users from a certain location? We'll explore this in my next article which I'll upload in the next few days!

Glad that you've reached the end of this post. Let me know what you think of this approach by sending in your comments.

I hoped you learned something new from me today!

---

Hey, you! Follow me on [Twitter](https://twitter.com/projectkenneth)!
